Back
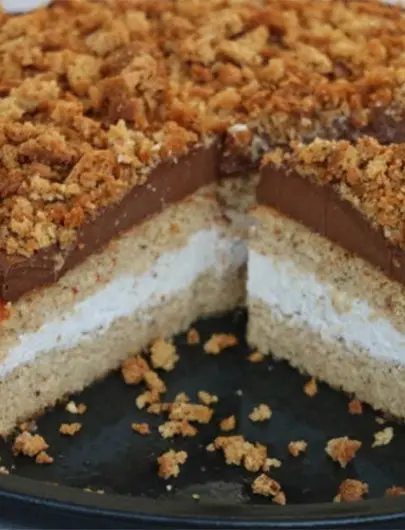
Luke has created a healthy spin on the classic Aussie 'Golden Gaytime' ice-cream. You'd never guess this tasty cake was gluten, dairy AND refined sugar free.
Ingredients:
Vanilla Sponge Cake
- 6 Eggs, separated
- 1/2 cup maple syrup
- 1 TBS and 1 tsp vanilla bean powder
- 1/2 cup unsweetened almond milk
- 3/4 cup coconut flour
- 3 teaspoons gluten free baking powder
Caramel Coconut Cream
- 2 small cans of unsweetened full fat coconut cream, 540ml total, placed in the fridge upside down overnight
- 6-8 TBS home made caramel
Caramel Sauce
- 1 x 270ml can unsweetened full fat coconut cream
- 1/2 cup maple syrup
- pinch of Himalayan Salt
- 2 tsp vanilla bean powder
Chocolate Frosting
- 1 large ripe avocado
- 2 tsp vanilla bean powder
- 1/2 cup raw cacao powder
- 1/4 cup maple syrup
- 1-2 TBS unsweetened coconut cream
Crunchy Nut Biscuit Crunch
- 1 TBS coconut oil
- 1/4 cup maple syrup
- 1 small egg
- 1 tsp vanilla bean powder
- Pinch of pink Himalayan salt
- 1/4 tsp cream of tartar
- 1/2 tsp bicarb Soda
- 3/4 cups blanched almond meal
- 1/2 cup desiccated, unsweetened coconut
- 1 1/2 TBS arrowroot (tapioca) flour
- 1/2 TBS unsweetened almond milk
Method:
Vanilla Sponge Cake
- Preheat oven to 175C degrees fan forced oven, 10 degrees less for conventional.
- Place the egg whites in a very clean mixing bowl (SO IMPORTANT FOR MERINGUE) and whisk on medium/high until soft peaks form.
- Slowly add the maple syrup; just 1 spoonful at a time. Mixture will triple in size and form stiffer peaks.
- Add the vanilla extract and whisk on medium/high until combined.
- Add egg yolks, 1 at a time, whilst still whisking. Add the next yolk only once the previous one has been combined.
- Add the milk whilst still whisking.
- In a separate bowl, combine the coconut flour and baking powder together.
- Add the dry ingredients to the wet and whisk on low until combined (you may need to scrape down the edges to ensure the coconut flour is fully combined).
- Turn the whisk to medium/high again and whisk for 30-60 seconds to make a fluffy mixture. The more effort you put in now, the lighter and fluffier sponge you'll end up with.
- Pour into a greased and lined cake tin.
- Bake for about 35 min, or until lightly golden on top and a skewer comes out clean.
- Allow the cake to cool before removing from the tin.
- Being super careful, cut the cake into 2 layers. I used a very sharp serrated knife.
- Place 1 layer of cake on to the tray you will serve on and spread with the Caramel Whipped Cream.
- Place the 2nd layer of the cake on top and freeze for about 30 minutes. This helps the cream stay firm and prevent the top layer of sponge from squishing it down too flat.
- Remove from the freezer and cover with the top with your chocolate frosting.
- Sprinkle and spread the biscuit crumbs all over the cake.
- Be sure to keep refrigerate and refrigerate between servings.
Caramel Cream
- Place the cream in the mixing bowl and using a hand held electric mixer with whisk attachment and whisk until thick.
- Add your home made caramel sauce, 1 tablespoon at a time and check for desired taste.
- Whip until thickened and place in fridge until set.
- Try not to eat it all right now.
Caramel Sauce
- Place the coconut cream, maple syrup and salt in a saucepan over medium/high heat.
- Bring mixture to boil, then reduce to medium heat.
- Allow the mixture to bubble until quite thick and dark golden in colour. Stir regularly to prevent burning.
- This will take 15-25 minutes (this will depend on the quality of your coconut cream)
- Add vanilla and continue to cook on medium heat for another 5 minutes.
- The caramel will be dark golden in colour and delicious.
- When cooler, place into a container and keep in fridge. The caramel will thicken as it refrigerates
Chocolate Frosting
- Remove the pip from the avocado and spoon the pulp into a blender.
- Add the vanilla, cacao and maple syrup and blend until thoroughly mixed.
- Stop and scrape down sides regularly to ensure that the avocado is broken up and blended in.
- Once thoroughly mixed, transfer to the mixing bowl of a stand mixer with a whisk attachment. (this step can be done in the blender)
- Add the whipped coconut cream and whisk until fluffy (2-3 minutes).
- Store in fridge until ready to use.
Crunchy Nut Biscuit Crunch
- Combine all the wet ingredients (except the milk) in a blender and mix until combined.
- Add the dry ingredients and blend until combined.
- Add the milk and pulse in.
- Place mixture in the fridge for a minimum of 30 minutes.
- Preheat oven to 175C/350F.
- Place heaped tablespoons of the mixture on the lined tray, at least 3cm (just over 1 inch) apart (this allows for spreading).
- Gently press with a fork to flatten slightly and create round shapes.
- Place tray in fridge for 15 minutes.
- Bake in oven for 16-18 minutes. The biscuits will be slightly brown on top.
- Cool on tray for 5 minutes then transfer to a wire cooling rack.
- Biscuits will firm up a they cool.
- Once cooled, place the biscuits into a zip lock bag and crush into small pieces.
Recipe created by Luke Hines Instagram| Facebook| Website
For more wholefood sweet treat recipes, download our recipe e-book here.

